Setting up a VPS (Virtual Private Server) running Windows can seem daunting, but with the right guidance, it can be a straightforward process. Whether you’re looking to host a website, run applications, or create a development environment, this comprehensive guide will walk you through the steps of setting up a Windows VPS server efficiently.

What is a Windows VPS?
A Windows VPS is a virtual server that runs on a Windows operating system. It provides dedicated resources, improved performance, and greater control compared to shared hosting. With a Windows VPS, you can install and run Windows-based applications, making it ideal for businesses that rely on Microsoft technologies.
Benefits of Using a Windows VPS
- Full Control: You have administrative access to your server, allowing you to configure settings, install software, and manage security.
- Enhanced Security: Your data is isolated from other users, providing a higher level of security compared to shared hosting.
- Scalability: Easily upgrade your resources as your needs grow without significant downtime.
- Compatibility: Ideal for running Windows-specific applications and services.
Step-by-Step Guide to Setting Up a Windows VPS
Step 1: Choose a Reliable VPS Provider
Before you can set up your Windows VPS, you need to choose a reliable hosting provider. Look for providers that specialize in Windows VPS hosting and offer:
- Good performance and uptime guarantees
- 24/7 customer support
- Flexible pricing plans
Recommended Provider: Windows VPS offers a variety of plans tailored to different needs, ensuring you find the right solution for your requirements.
Step 2: Select Your Plan
After selecting a provider, choose a plan that meets your needs. Consider factors such as:
- Resource Allocation: Ensure the plan includes enough CPU, RAM, and storage.
- Operating System Version: Choose the version of Windows that best suits your applications (e.g., Windows Server 2019, Windows Server 2022).
Step 3: Access Your VPS
Once you’ve signed up and your VPS is provisioned, you will receive login details. To access your Windows VPS:
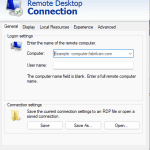
- Open Remote Desktop Connection (RDP): On your local Windows machine, search for “Remote Desktop Connection” in the Start menu.
- Enter the Server IP Address: Input the IP address of your VPS.
- Login: Use the credentials provided by your VPS provider to log in.
Step 4: Configure Your Server
After logging in, it’s time to configure your server:
- Change the Administrator Password: For security, change the default password immediately.
- Update Windows: Go to Settings > Update & Security > Windows Update and ensure your server is up to date.
- Configure Firewall Settings: Open Windows Defender Firewall and set rules based on your applications’ requirements.
Step 5: Install Necessary Software
Depending on your needs, you may want to install additional software:
- Web Server: If you’re hosting a website, install IIS (Internet Information Services) by going to Server Manager > Add Roles and Features.
- Database Server: Install SQL Server if your applications require a database.
- Other Applications: Install any other required software based on your specific use case.
Step 6: Set Up Security Measures
Security is paramount when running a VPS. Implement the following measures:
- Enable Windows Firewall: Ensure that the Windows Firewall is enabled and properly configured.
- Install Antivirus Software: Consider installing reputable antivirus software to protect against malware.
- Regular Backups: Set up a backup solution to regularly back up your data.
Step 7: Monitor Performance
Once your VPS is set up, monitor its performance regularly. Use Windows Performance Monitor to track CPU, memory, and disk usage. This will help you identify any potential issues before they escalate.
Setting up a Windows VPS server can significantly enhance your online capabilities, whether for hosting applications, managing databases, or running websites. By following this step-by-step guide, you can ensure a smooth setup process and optimize your server for performance and security.
For those looking for a reliable Windows VPS solution, consider Windows VPS for a range of plans that cater to various needs. With proper setup and management, your Windows VPS can become a powerful tool to support your business objectives.