Introduction
Connecting to a Virtual Private Server (VPS) from Windows 10 is an essential skill for web developers, system administrators, and anyone managing remote servers. Whether you’re hosting a website, running applications, or managing databases, knowing how to establish a secure connection to your VPS is crucial.
In this comprehensive guide, you’ll learn multiple methods to connect to your VPS on Windows 10, including Remote Desktop Protocol (RDP) for Windows servers and SSH connections for Linux servers. By the end of this tutorial, you’ll be able to access your VPS confidently and securely.
What You Need Before Connecting to Your VPS
Before you begin connecting to your VPS on Windows 10, ensure you have the following information:
- VPS IP Address: The public IP address of your virtual private server
- Username: Your VPS login credentials (typically ‘root’ for Linux or ‘Administrator’ for Windows)
- Password or SSH Key: Authentication credentials for your server
- Port Number: Default is 3389 for RDP and 22 for SSH
- Active Internet Connection: Stable connection for remote access
Method 1: Connect to Windows VPS Using Remote Desktop Connection
Remote Desktop Connection is the built-in Windows 10 tool for connecting to Windows-based VPS servers. This method provides a full graphical user interface experience.
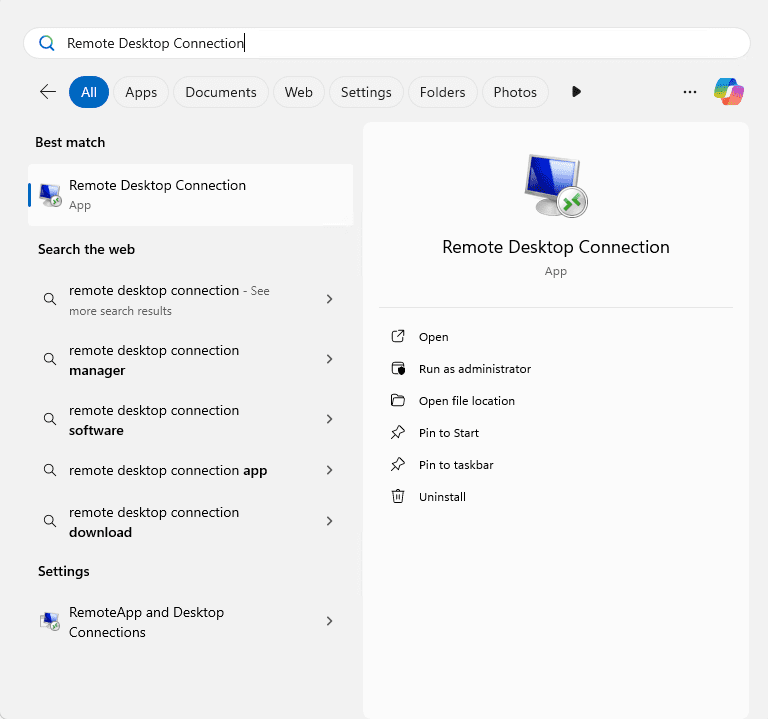
Step 1: Open Remote Desktop Connection
- Press Windows Key + R to open the Run dialog
- Type
mstscand press Enter - Alternatively, search for “Remote Desktop Connection” in the Windows search bar
Step 2: Enter Your VPS Details
- In the Computer field, enter your VPS IP address
- Click on “Show Options” to expand additional settings
- Enter your VPS username in the “User name” field
- (Optional) Check “Allow me to save credentials” for future convenience
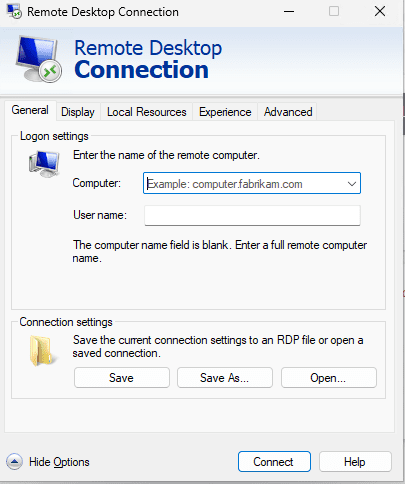
Step 3: Configure Connection Settings
Before connecting, you can optimize your settings:
- Display Tab: Adjust screen resolution for your remote session
- Local Resources Tab: Configure sound, keyboard, and local device access
- Experience Tab: Optimize performance based on your connection speed
Step 4: Establish the Connection
- Click the Connect button
- Enter your VPS password when prompted
- If you see a certificate warning, verify the server details and click “Yes”
- Wait for the connection to establish
Step 5: Verify Successful Connection
Once connected, you’ll see your Windows VPS desktop. You can now manage your server as if you were sitting in front of it physically.
Method 2: Connect to Linux VPS Using PuTTY on Windows 10
For Linux-based VPS servers, you’ll use SSH (Secure Shell) connections. PuTTY is the most popular free SSH client for Windows 10.
Step 1: Download and Install PuTTY
- Visit the official PuTTY download page at putty.org
- Download the Windows installer (putty-installer.msi)
- Run the installer and follow the installation wizard
- Complete the installation process
Step 2: Launch PuTTY
- Open PuTTY from your Start menu or desktop shortcut
- You’ll see the PuTTY Configuration window
Step 3: Configure Your SSH Connection
- In the “Host Name (or IP address)” field, enter your VPS IP address
- Ensure the Port is set to 22 (default SSH port)
- Select SSH as the connection type
- (Optional) Enter a name in “Saved Sessions” and click “Save” for future use
Step 4: Establish SSH Connection
- Click the Open button at the bottom of the window
- If this is your first connection, you’ll see a security alert about the server’s host key
- Click “Yes” to accept and continue
- A terminal window will open
Step 5: Login to Your VPS
- Enter your username when prompted (usually ‘root’)
- Press Enter
- Type your password (note: characters won’t appear as you type for security)
- Press Enter to login
Step 6: Verify Connection Success
After successful authentication, you’ll see your VPS command prompt. You can now execute commands and manage your Linux server.
Method 3: Connect to VPS Using Windows PowerShell SSH Client
Windows 10 version 1809 and later includes a built-in OpenSSH client, allowing you to connect to your VPS without third-party software.
Step 1: Verify SSH Client Installation
- Open PowerShell (search for it in the Start menu)
- Type
sshand press Enter - If you see SSH usage information, the client is installed
- If not, enable it through Windows Settings > Apps > Optional Features
Step 2: Connect Using SSH Command
- In PowerShell, type the following command:
ssh username@your-vps-ip-address - Replace “username” with your VPS username
- Replace “your-vps-ip-address” with your actual VPS IP
Step 3: Accept Host Key and Login
- When connecting for the first time, type
yesto accept the host key - Enter your password when prompted
- Press Enter to complete the login
Example Connection Command
ssh [email protected]
Method 4: Connect to VPS Using SSH Keys (Advanced)
SSH key authentication is more secure than password-based authentication and is recommended for production environments.
Step 1: Generate SSH Key Pair
- Open PowerShell or Command Prompt
- Run the following command:
ssh-keygen -t rsa -b 4096 - Press Enter to save in the default location
- (Optional) Enter a passphrase for additional security
Step 2: Copy Public Key to VPS
- Locate your public key at
C:\Users\YourUsername\.ssh\id_rsa.pub - Copy the contents of this file
- Connect to your VPS using password authentication
- Add the key to
~/.ssh/authorized_keyson your VPS
Step 3: Connect Using SSH Key
ssh -i C:\Users\YourUsername\.ssh\id_rsa username@vps-ip-address
Common Connection Issues and Troubleshooting
Issue 1: Connection Timeout
Causes:
- Incorrect IP address or hostname
- Firewall blocking the connection
- VPS is offline or not responding
Solutions:
- Verify your VPS IP address is correct
- Check your firewall settings on both Windows 10 and VPS
- Contact your VPS provider to ensure the server is running
- Verify the correct port is being used (3389 for RDP, 22 for SSH)
Issue 2: Authentication Failed
Causes:
- Incorrect username or password
- Account locked due to multiple failed attempts
- SSH key not properly configured
Solutions:
- Double-check your credentials
- Reset your password through your VPS control panel
- Wait before retrying if locked out
- Verify SSH key permissions are correct (should be 600 for private key)
Issue 3: Remote Desktop Connection Not Working
Causes:
- Remote Desktop not enabled on VPS
- Network Level Authentication issues
- Windows Firewall blocking RDP
Solutions:
- Enable Remote Desktop on your VPS
- Disable Network Level Authentication temporarily
- Configure Windows Firewall to allow RDP connections on port 3389
Issue 4: “Host Key Verification Failed” Error
Solution:
- Remove the old host key from
C:\Users\YourUsername\.ssh\known_hosts - Reconnect and accept the new host key
Security Best Practices for VPS Connections on Windows 10
1. Use Strong Passwords
- Create passwords with at least 12 characters
- Include uppercase, lowercase, numbers, and special characters
- Use a password manager to store complex passwords
2. Enable Two-Factor Authentication
- Many VPS providers offer 2FA for added security
- Use authenticator apps like Google Authenticator or Microsoft Authenticator
3. Change Default Ports
- Change SSH port from 22 to a custom port
- Change RDP port from 3389 to reduce automated attacks
4. Implement IP Whitelisting
- Configure your VPS firewall to only allow connections from your IP address
- This significantly reduces unauthorized access attempts
5. Keep Software Updated
- Regularly update Windows 10 on your local machine
- Keep your VPS operating system and applications updated
- Update PuTTY and other connection tools regularly
6. Use VPN for Additional Security
- Connect through a VPN when accessing your VPS from public networks
- This encrypts your connection and protects against eavesdropping
7. Monitor Connection Logs
- Regularly check VPS logs for suspicious activity
- Set up alerts for failed login attempts
- Review successful connections to ensure they’re legitimate
Alternative VPS Connection Tools for Windows 10
While Remote Desktop and PuTTY are the most common tools, here are other excellent options:
1. MobaXterm
- All-in-one solution with SSH, RDP, VNC, and more
- Built-in SFTP browser
- Tabbed interface for multiple sessions
2. Bitvise SSH Client
- Powerful SSH client with graphical SFTP
- Port forwarding capabilities
- Terminal emulation
3. Windows Terminal
- Modern terminal application from Microsoft
- Supports multiple profiles and tabs
- Customizable and integrates with PowerShell and Command Prompt
4. SecureCRT
- Professional-grade terminal emulator
- Advanced scripting capabilities
- Session management features
Tips for Efficient VPS Management on Windows 10
- Save Connection Profiles: Create saved sessions in your connection tools for quick access
- Use Screen Multiplexers: Tools like tmux on Linux VPS allow persistent sessions
- Set Up Aliases: Create shortcuts for frequently used SSH commands
- Organize Your Servers: Use naming conventions for multiple VPS connections
- Backup Authentication Keys: Store SSH keys and RDP profiles in a secure location
- Document Your Configurations: Keep notes on server settings and customizations
Frequently Asked Questions (FAQ)
Can I connect to multiple VPS servers simultaneously on Windows 10?
Yes, you can open multiple Remote Desktop Connection windows or PuTTY sessions to connect to different VPS servers at the same time.
Do I need administrator privileges on Windows 10 to connect to a VPS?
No, standard user accounts can connect to VPS servers. However, installing connection software like PuTTY may require administrator privileges.
Is it safe to save my VPS password in Remote Desktop Connection?
While convenient, saving passwords locally has security risks. Use this feature only on personal, secured computers, and consider using SSH keys instead.
Can I transfer files between Windows 10 and my VPS?
Yes, you can use Remote Desktop’s local resource sharing for Windows VPS, or SFTP clients like WinSCP or FileZilla for Linux VPS.
What’s the difference between VPS and VPN?
VPS (Virtual Private Server) is a remote server you connect to for hosting or computing. VPN (Virtual Private Network) is a secure connection method that encrypts your internet traffic.
Why does my Remote Desktop connection keep disconnecting?
Common causes include unstable internet connection, server resource issues, session timeout settings, or network configuration problems.
Conclusion
Connecting to a VPS on Windows 10 is straightforward once you understand the available methods. Whether you’re using Remote Desktop Connection for Windows servers or PuTTY for Linux servers, these tools provide reliable and secure access to your virtual private server.
Remember to prioritize security by using strong passwords, SSH keys, and keeping your systems updated. With the knowledge from this guide, you’re now equipped to manage your VPS efficiently and securely from your Windows 10 computer.
Start by choosing the method that best suits your VPS operating system and your technical comfort level. As you become more experienced, you can explore advanced features like SSH key authentication and connection automation to streamline your workflow.
Ready to connect? Follow the steps outlined in this guide and establish your first VPS connection on Windows 10 today!
Related Topics:
- How to secure your VPS server
- Best practices for VPS management
- VPS hosting comparison guide
- Linux server administration basics
- Windows Server remote management
Last Updated: October 2025
About This Guide: This comprehensive tutorial is designed for beginners and intermediate users who want to learn how to connect to their VPS from Windows 10. Whether you’re setting up your first server or looking to improve your connection methods, this guide provides step-by-step instructions and security best practices.