Connecting to a Windows Virtual Private Server (VPS) can be an essential skill for developers, IT professionals, and businesses looking to manage their servers remotely. This guide will provide you with a comprehensive overview of how to connect to a Windows VPS, covering the necessary tools, steps, and best practices to ensure a smooth connection.
What is a Windows VPS?
A Windows VPS is a virtualized server that runs on the Windows operating system. It provides users with dedicated resources, allowing for greater control and customization compared to shared hosting. This makes it an ideal choice for hosting applications, websites, or databases that require a stable and secure environment.
Prerequisites for Connecting to a Windows VPS
Before you can connect to your Windows VPS, you need to ensure you have the following:
- VPS Credentials: You will need the IP address of your VPS, along with your username and password. This information is typically provided by your VPS hosting provider upon setup.
- Remote Desktop Protocol (RDP) Client: Windows comes with a built-in Remote Desktop Connection tool. If you are using a different operating system, you may need to download an RDP client, such as Microsoft Remote Desktop for macOS or a third-party application like Royal TS or mRemoteNG.
Step-by-Step Guide to Connect to a Windows VPS
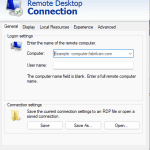
Step 1: Open Remote Desktop Connection
- On your Windows computer, click on the Start menu and type “Remote Desktop Connection” in the search bar. Click on the application to open it.
- If you are using macOS, open the Microsoft Remote Desktop application.
Step 2: Enter VPS Credentials
- In the Remote Desktop Connection window, enter the IP address of your Windows VPS in the “Computer” field.
- Click on Show Options to reveal additional settings. Here, you can enter your username under the “User name” field. The format is usually
AdministratororYourUsername.
Step 3: Configure Settings (Optional)
- You can adjust settings such as display size, local resources, and experience options based on your preferences. For example, you can choose to enable audio playback or clipboard sharing.
- If you plan to connect frequently, consider saving your credentials by clicking on Save As under the “General” tab.
Step 4: Connect to the VPS
- Click on the Connect button. You may receive a warning about the identity of the remote computer; if you trust the connection, click Yes to proceed.
- Enter your password when prompted and click OK.
Step 5: Managing Your VPS
Once connected, you will have access to your Windows VPS desktop. Here, you can manage files, install applications, and perform administrative tasks just as you would on a local machine.
Troubleshooting Connection Issues
If you encounter issues while trying to connect to your Windows VPS, consider the following troubleshooting steps:
- Check Network Connection: Ensure your internet connection is stable and functioning properly.
- Verify Credentials: Double-check the IP address, username, and password for accuracy.
- Firewall Settings: Ensure that your local firewall or antivirus software is not blocking the RDP connection.
- VPS Status: Log in to your hosting provider’s dashboard to check if your VPS is running without issues.
Conclusion
Connecting to a Windows VPS is a straightforward process that can significantly enhance your ability to manage your server remotely. By following the steps outlined in this guide, you can establish a secure connection and efficiently perform tasks on your virtual server. For more information on Windows VPS options and configurations, visit Windows VPS. With the right tools and knowledge, you can leverage the full potential of your Windows VPS to support your business or development needs.