Connecting to a Virtual Private Server (VPS) from your Windows 11 machine can significantly enhance your productivity, allowing you to manage applications and services remotely. This guide will walk you through the process of connecting to a VPS using Windows 11, ensuring you have a smooth and secure experience.

What is a VPS?
A Virtual Private Server (VPS) is a virtualized server that mimics a dedicated server within a larger physical server. It provides users with dedicated resources, better performance, and increased security compared to traditional shared hosting. VPS is ideal for businesses and individuals who need more control over their hosting environment.
Prerequisites for Connecting to Your VPS
Before you connect to your VPS, ensure you have the following:
- VPS Access Credentials: This includes the IP address of your VPS, your username (usually “root” for Linux or “Administrator” for Windows), and your password.
- Remote Desktop Protocol (RDP): This is built into Windows 11 and allows you to connect to your VPS easily.
Step-by-Step Guide to Connect to VPS on Windows 11
Step 1: Open Remote Desktop Connection
- Press the Windows key or click on the Start menu.
- Type Remote Desktop Connection in the search bar and select the application from the results.
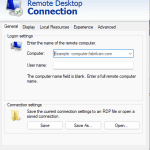
Step 2: Enter Your VPS IP Address
- In the Remote Desktop Connection window, enter the IP address of your VPS in the “Computer” field.
- Click on Show Options to expand the settings.
Step 3: Configure Additional Settings (Optional)
- Under the User name field, enter your username (e.g., “Administrator”).
- You can also click on the Local Resources tab to configure settings for audio and keyboard preferences.
- If you want to save your credentials for future use, check the box for Allow me to save credentials.
Step 4: Connect to Your VPS
- Click on the Connect button.
- You will be prompted to enter your password. Input the password associated with your VPS account.
Step 5: Accept the Certificate Warning
If this is your first time connecting to the VPS, you may see a warning about the identity of the remote computer. This is normal. Click on Yes to proceed.
Step 6: Manage Your VPS
Once connected, you will see your VPS desktop environment. You can now manage your applications, files, and settings just as you would on a local machine.
Troubleshooting Common Connection Issues
- Incorrect Credentials: Double-check your IP address, username, and password.
- Firewall Settings: Ensure that your local firewall or the VPS firewall is not blocking the RDP port (default is 3389).
- Network Issues: Verify your internet connection and ensure that your VPS is powered on and accessible.
Recommended Provider: Windows VPS
For those seeking reliable VPS solutions, consider Windows VPS. They offer a range of Windows-based VPS plans, ensuring you have the resources and support needed for seamless remote management.
Connecting to a VPS on Windows 11 is a straightforward process that opens up a world of possibilities for managing your applications and services remotely. By following the steps outlined in this guide, you can easily establish a secure connection and take full advantage of your VPS. Whether you’re running a small business or managing a personal project, mastering VPS connectivity is a valuable skill that can enhance your productivity and efficiency. Start your journey today and unlock the full potential of your Windows 11 experience!