If you’ve recently acquired a Windows Virtual Private Server (VPS), you might be wondering how to connect to it. This process is essential for managing your server and accessing its resources effectively. In this guide, we’ll walk you through the steps on how to connect to your Windows VPS, ensuring you have a smooth experience. For detailed insights on Windows VPS, check out how to connect vps windows.
Connecting to a Windows VPS typically involves using Remote Desktop Protocol (RDP), which allows you to access your server as if you were sitting right in front of it. Here’s a simple step-by-step process to get you started.
Step 1: Gather Your Connection Details
Before you can connect to your Windows VPS, you’ll need a few key pieces of information:
- IP Address: This is the address of your VPS. You should have received it when you set up your server.
- Username: This is usually “Administrator” unless you’ve set up a different user.
- Password: This is the password you created during the VPS setup process.
Make sure you have these details handy, as you’ll need them for the connection.
Step 2: Open Remote Desktop Connection
On your local Windows machine, follow these steps to open the Remote Desktop Connection tool:
- Click on the Start menu.
- Type “Remote Desktop Connection” in the search bar and select the application from the results.
If you’re using macOS, you can download the Microsoft Remote Desktop app from the Mac App Store.
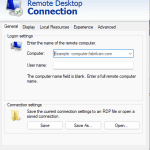
Step 3: Enter Your VPS Information
Once you have the Remote Desktop Connection window open, you’ll see a field labeled “Computer.” Here’s what to do:
- Enter the IP address of your VPS in the “Computer” field.
- Click on the Show Options drop-down if you want to save your username for future connections.
Step 4: Connect to Your VPS
After entering the IP address, click the Connect button. You will be prompted to enter your username and password. Input the credentials you gathered earlier:
- Username: Enter your username (usually “Administrator”).
- Password: Input your password.
Once you’ve entered the correct information, click OK.
Step 5: Accept the Security Certificate
The first time you connect, you may see a warning about the identity of the remote computer. This is a standard security measure. If you are sure you are connecting to the right server, click Yes to proceed. This step ensures that your connection is secure.
Step 6: Explore Your Windows VPS
Congratulations! You are now connected to your Windows VPS. You’ll see the desktop interface, just like you would on a local Windows machine. Here, you can manage files, install applications, and configure settings just as you would on any other Windows computer.
Step 7: Disconnecting from Your VPS
When you’re finished using your VPS, you can disconnect by simply closing the Remote Desktop Connection window. If you want to log off from the server entirely, you can do so from the Start menu within the VPS environment.
Additional Tips
- Firewall Settings: Ensure that your local firewall allows outbound connections on port 3389, which is the default port for RDP.
- Dynamic DNS: If your VPS IP address changes frequently, consider using a Dynamic DNS service to make connecting easier.
- Security Best Practices: Always use strong passwords and consider changing the default RDP port for added security.
Connecting to a Windows VPS using Remote Desktop Protocol is a straightforward process that opens up a world of possibilities for managing your server. By following these steps, you can access your VPS easily and efficiently. Whether you are running applications, hosting websites, or managing databases, having a reliable connection to your Windows VPS is essential for your success. Explore your server, make the necessary configurations, and enjoy the benefits of your new hosting environment!