Connecting to a Windows VPS from Windows 10 does not require any third-party software: the Remote Desktop Connection client (mstsc.exe) has been built into Windows for decades. This guide walks through the RDP client setup step by step, covers the server-side settings that must be in place first, and explains the most common connection errors and how to fix them. If your server runs Windows Server with Remote Desktop enabled, the whole process takes under two minutes once you have your credentials.
What You Need Before You Connect
- IP address or hostname of the server — found in your provider’s control panel.
- Username — typically
Administratoron a fresh Windows Server instance. - Password — the one your provider generated, or the one you set after first login.
- Port 3389 reachable — open in both the Windows Firewall and any provider-level firewall.
- A stable internet connection — RDP is sensitive to packet loss and high latency.
Step 1: Enable Remote Desktop on the Server
Most VPS templates ship with Remote Desktop already enabled, but verify it: open Server Manager, click Local Server, and check that Remote Desktop shows Enabled. Alternatively, right-click This PC → Properties → Remote desktop, and select Remote Desktop. On the same page, make sure Network Level Authentication (NLA) is checked — more on that below. On Server Core, run Set-ItemProperty -Path 'HKLM:\System\CurrentControlSet\Control\Terminal Server' -Name fDenyTSConnections -Value 0 from an elevated PowerShell session.
Step 2: Open the Remote Desktop Client
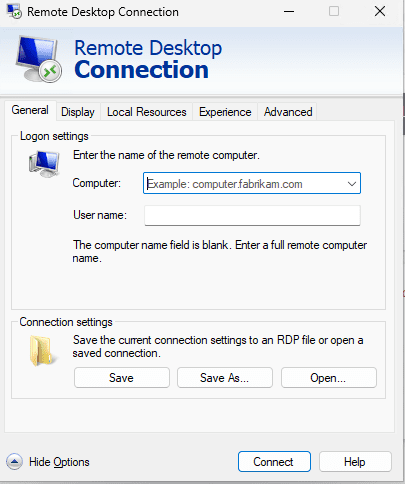
Press Win + R, type mstsc, and press Enter. You can also search for “Remote Desktop Connection” in the Start menu and pin it to the taskbar — you will use it often. The client window is intentionally small: a Computer field, a User name field, and a Connect button.
Step 3: Enter the Server Address and Credentials
Type the server’s IP address (or hostname) into the Computer field. Click Show Options to expand the dialog, enter the username, and check Allow me to save credentials so you are not retyping them every session. Click Connect. If Windows asks for a password, enter it — or, if you saved credentials, the client logs straight in.
Step 4: Deal With the Certificate Warning
The first connection to a fresh server shows a certificate warning: “The identity of the remote computer cannot be verified.” This is normal when connecting by raw IP, because the server’s self-signed certificate does not list the IP as a name. Verify that the IP shown in the warning matches the server you intended to reach, then click Yes. Once you are in, Windows Server usually forces a password change on first login — choose a long passphrase and store it in a password manager.
Network Level Authentication and Why It Matters
NLA authenticates you before a full remote session is created, which means attackers cannot even open a login screen without valid credentials — a meaningful defense against credential-stuffing and resource exhaustion. Keep it enabled on the server. If you see “The remote computer requires Network Level Authentication,” the client machine has NLA disabled; re-enable it in the client’s group policy or, on the server, temporarily uncheck the NLA box only long enough to diagnose (then re-enable it).
Common RDP Connection Errors and Fixes
| Error message | Typical cause | Fix |
|---|---|---|
| “This computer can’t connect to the remote computer” | Server offline, port 3389 blocked, or network path broken | Verify the IP, test with Test-NetConnection <IP> -Port 3389, open the port in Windows Firewall and the provider firewall |
| “The remote computer requires Network Level Authentication” | NLA disabled on the client | Enable NLA on the client, or temporarily disable it on the server to diagnose |
| “Your credentials did not work” | Wrong username format or password | Use .\Administrator or <IP>\Administrator as the username |
| “The logon attempt failed” | Account locked, disabled, or password expired | Reset the password from the provider’s console or VNC viewer |
| “No Remote Desktop client access licenses” | RDS licensing grace period exhausted | Install and activate the Remote Desktop Licensing role and add CALs |
| CredSSP encryption oracle error | Client and server versions out of sync | Apply Windows updates on both ends, or add the AllowEncryptionOracle registry key as a last resort |
Security Basics for Your RDP Connection
RDP on the default port is a constant target for brute-force scans, so build good habits from day one. Use a strong, unique password. Keep the Remote Desktop Users group limited to the accounts that actually need access. Enable an account lockout policy (for example, five failed attempts, lock for 15 minutes) so automated guessing stalls quickly. If your provider supports it, restrict inbound port 3389 to your own IP address, and consider a Remote Desktop Gateway or a VPN for anything beyond a single admin. When you manage several servers, save a separate .rdp file per machine — and if you are comparing providers, review which Windows VPS providers include firewall and security tooling out of the box.
When Connecting Fails, Check in This Order
- Is the server reachable?
Test-NetConnection <IP> -Port 3389. - Is Remote Desktop actually enabled on the server?
- Is port 3389 open in both the Windows Firewall and the provider’s firewall?
- Are you using the right username format (
.\Administrator)? - Is NLA the blocker, or is the account locked or expired?
- Has the RDS licensing grace period run out?
Working through that list in order resolves the vast majority of failed connections without touching the server console. Once the session is up, your next task is securing the box: check the security features to look for in a Windows VPS plan before you deploy anything important.
Need a server to connect to? Deploy a Windows VPS on Vultr and put this RDP setup guide to use.